Technology In Trial (Part 1): How To Excel With Excel
Some practical pointers from legal technology columnist Jeff Bennion about how to use Microsoft Excel during depositions or at trial.
![]() I’ve spent the last few weeks in various trials, either helping or just watching. Recently, I was watching the Anna Alaburda trial that we’ve covered here multiple times. I’ve seen some really skilled trial attorneys do what they do best, but I’ve also seen them stumble in ways they should not stumble.
I’ve spent the last few weeks in various trials, either helping or just watching. Recently, I was watching the Anna Alaburda trial that we’ve covered here multiple times. I’ve seen some really skilled trial attorneys do what they do best, but I’ve also seen them stumble in ways they should not stumble.
The Alaburda trial has a lot of exhibits. There is a rolling bookshelf of binders behind each set of attorneys. Each attorney has a trial technician running some kind of trial presentation software. The attorney says, “Let me see exhibit 300, page 4.” Seconds later, exhibit 300 page 4 comes up on the screen, and they can zoom and highlight on all of the pages. Everything was going great until one of the attorneys for the defense said something along the lines of, “Ok, now I have an Excel spreadsheet and, since I can’t put it on the screen, I’m just going to give it to you and have you describe it for the jury.” Seeing litigators stumped by large spreadsheets is not uncommon, but it’s such a weird stumbling block.
It’s a common problem in depos and in trials where you have a spreadsheet with over 100 columns and rows and you can’t figure out how to get someone to reference cell AA84 while keeping the rest of the information around it in context. The problem is that a spreadsheet that size is not a multi-page document. It’s a single page. It’s a huge canvas that, if printed out, could be one document that is 20 feet by 20 feet. Often, the Excel file will have one Bates number for the entire document. It certainly makes it a challenge to use a single piece of data. Anyway, here’s how you do it:

The Business Case For AI At Your Law Firm

I’m using a large Excel spreadsheet I found by Googling “Excel file.” Here’s the link. It’s got 12 columns and about 1,700 rows. With default settings, it’s about 96 pages to print.
Adjust Your Page Settings:
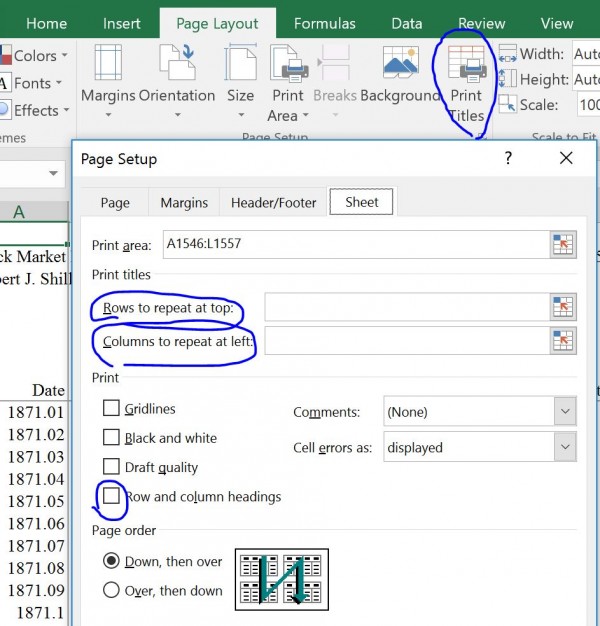
The first thing I’m going to want to do is to make sure that my print settings are correct. On the Page Layout tab, click on Print Titles. That gives you the following options:
Sponsored

Is The Future Of Law Distributed? Lessons From The Tech Adoption Curve
The Business Case For AI At Your Law Firm

Early Adopters Of Legal AI Gaining Competitive Edge In Marketplace

Legal AI: 3 Steps Law Firms Should Take Now
Selecting “Rows to repeat at top,” you are able to select column headers to be at the top of each page. Looking at page 48 in the 4th column on the page, 8th row does not give you much context. Adding the column header helps you see what you’re looking at. You can use the “Columns to repeat at left” option if, say, you have a large spreadsheet with law school employment statistics and columns going across multiple pages and you want to keep the name of the law school on each page in the left column.
Similarly, if you want to keep the row and column letters and numbers at the edges of the page, select the “Row and column headings” option. That way, when you are talking about cell BD87, it makes it easier to find.
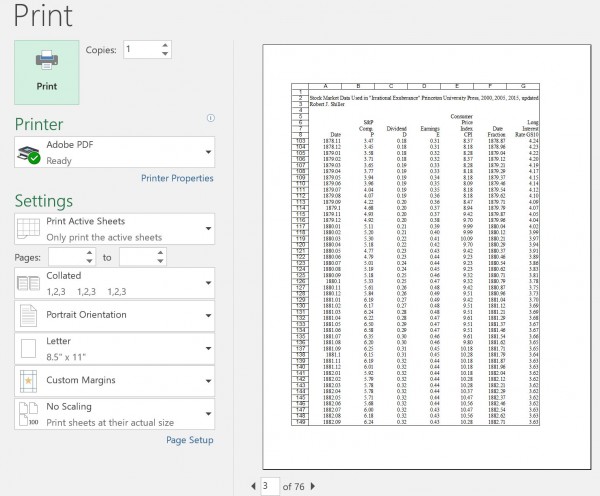
For example, here I have selected to keep rows 1-8 at the top of each page because that’s where my header information is. I’ve also selected to show the row and column headings. You can see that this is page 3 of 76 and the rows at the top are 1-8, followed by row 103. The page also only shows columns A-G, which brings me to my next trick…
Adjust Your Layout:
Sponsored

Navigating Financial Success by Avoiding Common Pitfalls and Maximizing Firm Performance
Legal AI: 3 Steps Law Firms Should Take Now
Press Print and you’ll get your printing options. At the bottom, under Scaling, you have the option to fit the document onto one page, fit all rows on one page, fit all columns on one page, or do some custom scaling. Here, as you can see above, I am able to fit a little more than half of my columns on one page.
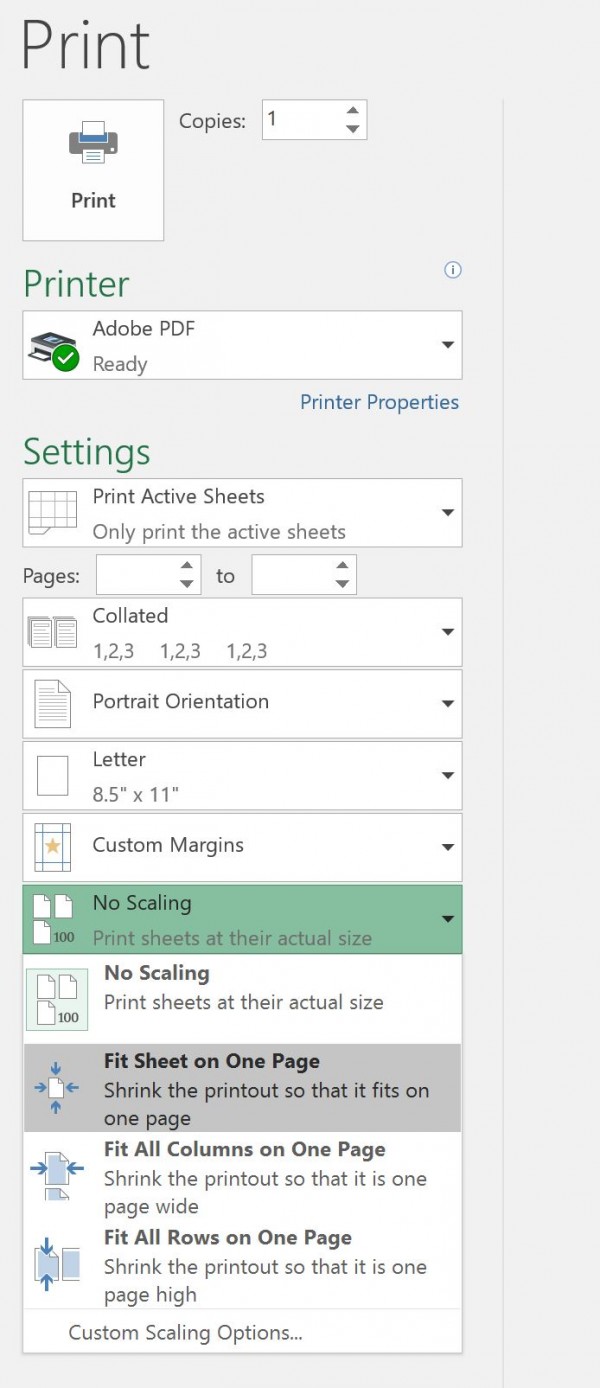
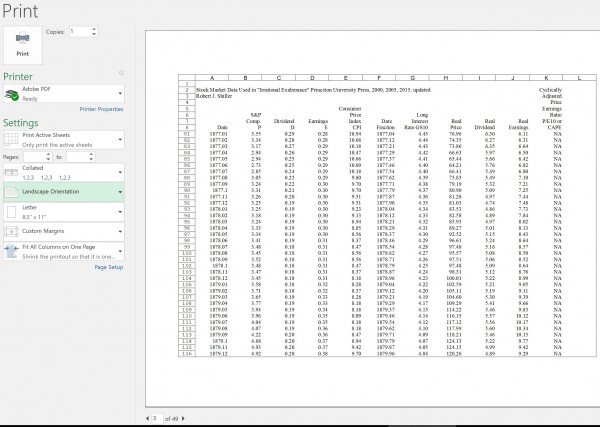
If I select “Fit All Columns on One Page,” I can fit the other 5 columns, but the font is too small to read, so I also change the orientation from portrait to landscape in the printing options here.
My 76 page document is now 49 pages and is much easier to read:
Add the Finishing Touches:
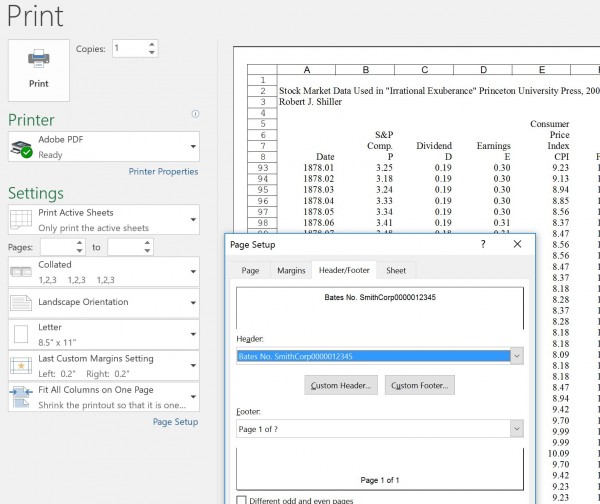
Next, click Page Setup under the scaling options. Adjust the margins if you want to make the margins more narrow to get more information on each page and reduce your page count. Also, add a header and footer to each page. Remember, this document, even though it takes up 49 pages of 8.5″ x 11″ paper, is still just one big sheet, so it only has one Bates number. But since we don’t have 20″ sheets of paper (and wouldn’t want to use them if we did), we have to somehow break the document into pieces to use at trial or in a depo, and be able to identify for the record the piece of that document we are using. So, I always add a header or footer with the Bates number for that document and the page number.
Go into the Page Setup options and click on Header/Footer and add the Page 1 of ? and a header with the document’s Bates number:
The finished page will look like this:
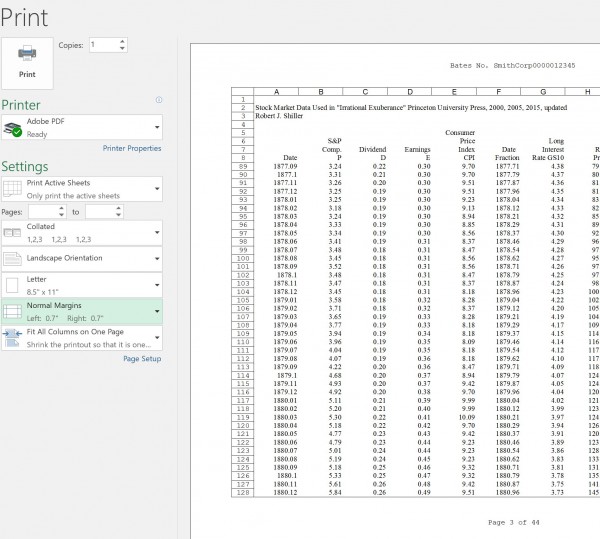
I’m down to 44 pages and I have all of the information on each page to easily identify data in each cell, no matter how large the spreadsheet is.
One more thing. This spreadsheet has multiple tabs. Saying you are on a certain cell of a certain spreadsheet doesn’t tell you exactly where you are looking for the record. If you have multiple tabs, you can add the tab name also as a footer item. This spreadsheet has two graphs and one tab with the data called “Data.” I can go back into the header/footer options in Page Setup and select a custom footer and put my Page 1 of ? in the middle and on the right, choose to have the tab name:

Here, you can see the tab name “Data” is printed out on each page.
One last tip:
If you can, print to PDF first on large spreadsheets and then print the PDF once you see that it is fine. That way, if you think it looks fine, but after you print your 800 page spreadsheet, you see that one of the columns went onto the next page for some reason, you can fix it without wasting time and paper.
Part 2 is going to be about how to do openings/closings and how to setup a digital wireless note passing system in trial to avoid having to pass post-its between co-counsel.
Part 3 is going to be about how to cut down on your clutter at the lectern and on your counsel table and stay organized.
Jeff Bennion is Of Counsel at Estey & Bomberger LLP, a plaintiffs’ law firm specializing in mass torts and catastrophic injuries. He serves as a member of the Board of Directors of San Diego’s plaintiffs’ trial lawyers association, Consumer Attorneys of San Diego. He is also the Education Chair and Executive Committee member of the State Bar of California’s Law Practice Management and Technology section. He is a member of the Advisory Council and instructor at UCSD’s Litigation Technology Management program. His opinions are his own. Follow him on Twitterhere or on Facebook here, or contact him by email at jeff@trial.technology.
